5 pro secrets for great photos
Ok, they're not really secrets but I'm conditioned to write heads like that so it will jazz up the search rankings.
Once a marketer, always a marketer.
Man, I see some crap photos these days--selfies on iPhones, dim blurry restaurant groupies, truly sucky event snaps. It seems the camera phone has replaced the digital point and shoot which replaced the APS P&S which in turn replaced the truly horrid "disposable camera" as the memory recorder of choice.
I shot a family wedding recently and--reviewing the pics--everyone is oohing and awing over how great the shots are.
 Actually, no, they're not that great. They're pretty good, for sure, but mostly it's that I know a few tricks and I always use them.
Warning: not all of these are even possible with your iPhone. If you want the equivalent of a crappy Polaroid to mark that memorable event, by all means use your camera phone. If you want something that you might actually be proud to show someone, at least get a simple P&S camera with some basic controls.
Nobody and I mean nobody likes blurry pictures. It's really simple to take a sharp picture, since only two factors are involved: what you do with your hands and the shutter speed.
Paul Stewart taught me to hold a camera in 1977 and it was the single best tip anyone ever showed me. Your typical point and shoot you're going to hold like a vast cheeseburger headed for your pie hole. The important thing is to hold it very firmly and to SQUEEZE the shutter, never punch it. A SLR you want to hold in the following way: make your left hand into a little table, thumb out and pinky closest to you. Palm up. Let the camera body rest on your palm while your thumb and first finger of the left hand cradles the lens. Now you can adjust the focus or aperture zoom or whatever adjustment rings are there. The right hand grips the shutter-side of the camera with the forefinger over the shutter button.
On my Canon EOS systems the right thumb can work the control wheel and the shutter finger can handle the little knob on top. Dig your elbows into your sides to lock the camera into position. Squeeze the shutter release.
An SLR is far more versatile than a point and shoot because of the interchangeable lenses. But it has a mirror that blocks the film plane/digital sensor so in order to take a picture when you release the shutter the mirror swings up while the shutter is open and then swings back down. This happens REAL FAST and so there is some vibration imparted to the camera at the worst possible time. A heavy camera/lens combo will dampen some of the vibration compared to a light-weight body and plastic lens. This is one of the reason that professional SLR systems are heavy.
You can practice holding a camera steady by taping a little mirror to the front and reflect a point of light onto a nearby wall. Watch the reflection when you press the shutter to try to keep it from moving--it will amplify any slight movement you make.
The second factor is the shutter speed. A good rule of thumb is you need at least 1/125th of a second to take a picture of people holding still and much much faster to capture any motion. If you're not sure the image is sharp zoom in using the "play" function and check things like people's eyes. Here's what sharp looks like:
When we look at things with our eyes, our brain tends to ignore stuff we're not focused on. (If you haven't seen the famous experiment of people not seeing a gorilla in a basketball game you should check it out.) But when we take a photo the camera isn't that smart, and the background will suddenly jump out of the resulting image. This is how you get a tree growing out of someone's head. Sometimes you can move people around (or yourself to change the angle) to make a cluttered background go away. In a studio the photographer will hang a background up to solve the problem--we've all see this. Here's my pro tip: blur the background using the depth of field aspect of all optics.

Once a marketer, always a marketer.
Man, I see some crap photos these days--selfies on iPhones, dim blurry restaurant groupies, truly sucky event snaps. It seems the camera phone has replaced the digital point and shoot which replaced the APS P&S which in turn replaced the truly horrid "disposable camera" as the memory recorder of choice.
I shot a family wedding recently and--reviewing the pics--everyone is oohing and awing over how great the shots are.
Tip Number 1: Sharp always wins
Nobody and I mean nobody likes blurry pictures. It's really simple to take a sharp picture, since only two factors are involved: what you do with your hands and the shutter speed.
Paul Stewart taught me to hold a camera in 1977 and it was the single best tip anyone ever showed me. Your typical point and shoot you're going to hold like a vast cheeseburger headed for your pie hole. The important thing is to hold it very firmly and to SQUEEZE the shutter, never punch it. A SLR you want to hold in the following way: make your left hand into a little table, thumb out and pinky closest to you. Palm up. Let the camera body rest on your palm while your thumb and first finger of the left hand cradles the lens. Now you can adjust the focus or aperture zoom or whatever adjustment rings are there. The right hand grips the shutter-side of the camera with the forefinger over the shutter button.
On my Canon EOS systems the right thumb can work the control wheel and the shutter finger can handle the little knob on top. Dig your elbows into your sides to lock the camera into position. Squeeze the shutter release.
An SLR is far more versatile than a point and shoot because of the interchangeable lenses. But it has a mirror that blocks the film plane/digital sensor so in order to take a picture when you release the shutter the mirror swings up while the shutter is open and then swings back down. This happens REAL FAST and so there is some vibration imparted to the camera at the worst possible time. A heavy camera/lens combo will dampen some of the vibration compared to a light-weight body and plastic lens. This is one of the reason that professional SLR systems are heavy.
You can practice holding a camera steady by taping a little mirror to the front and reflect a point of light onto a nearby wall. Watch the reflection when you press the shutter to try to keep it from moving--it will amplify any slight movement you make.
The second factor is the shutter speed. A good rule of thumb is you need at least 1/125th of a second to take a picture of people holding still and much much faster to capture any motion. If you're not sure the image is sharp zoom in using the "play" function and check things like people's eyes. Here's what sharp looks like:
 |
| What sharp looks like. |
Tip Number 2: The background is never your friend.
When we look at things with our eyes, our brain tends to ignore stuff we're not focused on. (If you haven't seen the famous experiment of people not seeing a gorilla in a basketball game you should check it out.) But when we take a photo the camera isn't that smart, and the background will suddenly jump out of the resulting image. This is how you get a tree growing out of someone's head. Sometimes you can move people around (or yourself to change the angle) to make a cluttered background go away. In a studio the photographer will hang a background up to solve the problem--we've all see this. Here's my pro tip: blur the background using the depth of field aspect of all optics.
 |
| Blur the background to make the image pop. |
In the photo above, you can see that the man's face is focused but the background is blurred into obscurity. Not only does it not interfere with the image but it makes the foreground image "pop." I got this effect by using a long lens (a zoom telephoto) with a large aperture (F2.8). You may have to play around with your camera to get a similar effect. If you can't get a sufficiently short depth of field with your P&S, try buying a telephoto adapter that screws onto the front of the built-in lens-that should do the trick. Make sure the lens is wide-open (small F number) as the depth of field increases as you stop down the lens (larger F number).
Tip Number 3: shoot into the light
If you look at outdoor model shots, you'll see basically two kinds of lighting. One is where the light is subtle (like in the shade or under light clouds) and the other is with the sun behind the model. While the former is always great for saturated colors without harsh shadows, sometimes you don't have a choice. Whatever you do, don't have your subjects look into the sun--they will look horrid and they'll squint.
You get several nice benefits of this angle with people. Look at the picture above. Light behind hair gives you lovely hair highlights and showcases those loose strands. The shadows on the face provide modeling which emphasizes the contours. And your subject will have wide open eyes and relaxed expression because she's not squinting into the sun.
An automatic camera (like all of them today) will tend to underexpose the face in this kind of shot. I left it like that for the picture above because I like the effect. But normally you have open up a bit to get the face correctly exposed. You may blow out some highlights but usually that's ok. Here's a picture taken by my good friend David Rogers that shows blowing out highlights can be a good thing. Shooting into the late afternoon sun creates the mood perfectly--the boat at the end of the day, getting ready to drop anchor.
 |
| Photo by David Rogers |
Tip Number 4: On camera flash is evil.
Virtually every camera for sale has a built in flash. My advice to you is this:
Don't use it.
 |
| This is what on-camera flash will do for you. |
The flash is there because the camera wouldn't sell without it. But if you're taking pictures of people, and using a flash right next to the lens, you will get a horrible photo. Think mug shot.
If you have to take pictures indoors at night you're better off using ambient light and setting your camera to its most sensitive setting. The one exception I'll make to using on-camera flash is to kill deep shadows when the sun is behind the subject (see the tip above). In that case, turn the flash down if possible so you don't just create a daylight mug shot.
What do pros do? They use external flash units, sometimes on a special bracket to move the flash away from the lens. This is primarily to prevent red-eye, which isn't as big a problem with modern technology as it used to be with film cameras. The other ubiquitous technique pros use is to diffuse the flash, either by a little translucent cover over the flash or by pointing it at the ceiling or some other reflective surface. Note: when you bounce flash, the color of the reflective surface will color the light. Back in the stone age I used to put a Kleenix over the flash with a rubber band to soften it a bit.
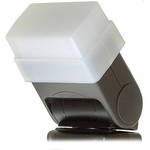 |
| I use one of these Sto-Fen diffusers on my flash. |
Boucing off a white ceiling is a great way to get indoor photos:
 |
| Hans was happy the flash didn't interfere with eating this toy. |
Tip Number 5: Wide angle is for landscapes; long lens for people.
In the beginning camera lenses had only one focal length and you had to carry several if you wanted some flexibility. This was about the time that someone invented the camera bag to lug all that stuff around. Then zoom lenses appeared and we never looked back. For a long time zoom lenses were optically inferior to "prime" lenses but that's not always true anymore. In any case, every modern point and shoot camera comes with a built in zoom lens. These lenses try to cover all possible shooting situations from extreme wide angle to telephoto. If you don't think there might be some compromises taken in order to achieve such optical magic on a $300 camera I've got a bridge to sell you.
When you get to Mount Rushmore by all means use the wide angle setting to get in the whole scene. But when you're taking a picture of the kids at the rest stop, resist the temptation to stand close to them and shoot the widest possible angle. A better plan is to stand back a ways and use a longer lens setting.
What's the downsize of wide angle lenses on people? To name just a few:
- Wide angle lenses distort the image--the tend to magnify whatever is closest to the lens. When you're shooting faces, that usually means the nose. Unless you want everyone to look like they're in a Jimmy Durante contest, use a longer focal length.
- Wide angle gives you a lot of depth of field, which is good for the iconic image of the wild flowers with Mount Rainier in the background and both are sharp. With a telephoto you could make the wildflowers sharp but the mountain would be blurred (mostly--it depends a lot on the aperture when you take the picture). See the tip about blurring the background above--having the background in sharp focus means it's competing with the subject of the photo for your eye's attention.
- Wide angle makes things small, which lets me slip in a sixth tip: get in close. Most of the photos I take will get cropped to get rid of the less interesting stuff and emphasize the subject. Fill the frame with what's interesting. Do it not by sticking the camera into someone's face, but by using that zoom. See below.
 |
| Not a bad picture before cropping. |
 |
| Cropping makes it better. |


0 Comments:
Post a Comment
<< Home